If you would like to make your own car decals then we have the perfect product for you!
Here at PhotoPaperDirect.com we sell Printable Vinyl Sticker Paper. You can use this printable vinyl in your desktop inkjet printer with standard ink cartridges so that you can print stickers or car decals from the comfort of your own home.
The colours appear extremely vibrant on the vinyl and it’s a very easy product to use. All you do is pick your chosen image or images, print them from your computer onto the vinyl sheet (using a high resolution print setting) and then cut carefully around the designs and apply to your chosen surface, like your car bumper for example.
We have the printable vinyl available in Glossy, Matt and Clear. The designs printed on the Glossy and Matt vinyl papers will be water resistant but they can be made waterproof by spraying them with a fixative spray. After this spray varnish application they will be able to withstand prolonged outdoor use as the colours will not fade in the sun and the image will not wash off in the rain or during a car wash (re-applying from time to time possible).
Please note that the clear vinyl is not water resistant unless you use a fixative spray. Once you have used the spray it will then become waterproof, the same as the other two.
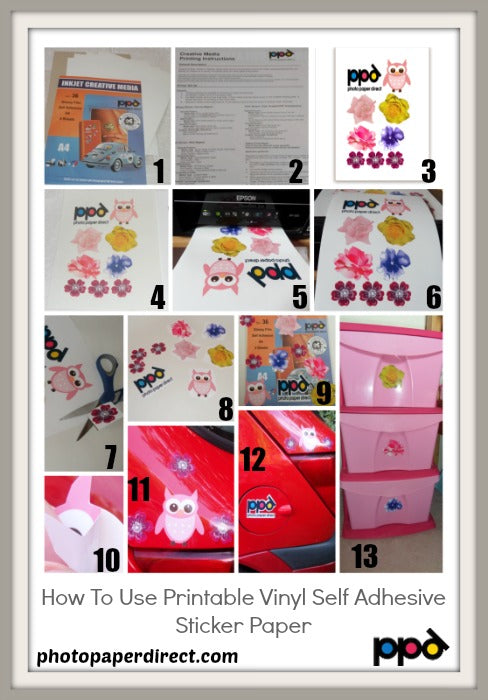
I will talk you through how to make your own car decals in the step-by-step instructions below (the numbers correspond to the collage photo above) :-
1. The first thing to do is buy a pack of Matt, Glossy or Clear Printable Vinyl Sticker Paper from us. There are various pack sizes to choose from (anything from 5 sheets in a pack to 1000).
2. Once you have opened the pack of printable vinyl you will see there is an instruction sheet that explains how to print onto our vinyl sheets. Have a read of the printing guide and if you’d like to watch a video tutorial you can view that here.
3. Next you have to decide which images you would like to print out as stickers or car decals. For this project I found a few clipart designs that I liked. The website I used was clker.com but there are plenty of other free clipart websites out there. The other option you have is to use your own photos or drawings and then print them out as stickers. I pasted my chosen designs into a Word document and then arranged them so that I could get the maximum use out of one sheet of printable vinyl.
4. Before you take the plunge and print your designs out onto the vinyl….take a moment to print the designs out on a sheet of plain printing paper. By doing this you will be able to make sure you are happy with how the designs appear when printed. The last thing you want to do is print out onto the vinyl sheet and then discover the images are placed incorrectly and you have wasted your sheet of vinyl.
5. Now that you’re happy with how the images will appear when printed, you are able to print them onto your vinyl sticker sheet. To do this you need to set your printer to a high resolution (d.p.i) under printer settings so that it will print clearly on your vinyl sheet. You then need to remove a sheet of the printable vinyl from the pack and place it into your printer so that the glossy side is in the right position to be printed on. With my Epson printer this means I put the vinyl sheet in with the glossy side up. (If you are using the clear or matt vinyl please put the paper in the printer so that the matt or clear side will be printed on). It’s now time to click print and watch your lovely new stickers being printed!
6. Once your stickers have finished printing, you need to leave the sheet for a few minutes to make sure that the ink is completely dry.
7. You need to find a sharp pair of scissors so you can cut out your images. I successfully used a quite large pair of scissors for the cutting out but a small, sharp pair would enable you to be more precise in cutting out the designs.
8. I found it easier to roughly cut around each design (leaving a white border) so that I could then take my time afterwards to go around and cut away all the white background from each image. It is much easier to accurately cut out each sticker when it is not on the A4 sheet.
9. Once you have cut out all your stickers you just need to decide what you are going to use them for. If you want to use them outside it is advisable to spray them with a fixative varnish spray so they will be waterproof and won’t fade in the sun.
10. To use the stickers all you have to do is peel away the backing paper from each design so that you can stick them down onto your chosen surface. The glossy and matt vinyl stickers have a semi-permanent adhesive which removes without leaving a residue whereas the clear vinyl has a permanent adhesive which will leave a residue which needs to be cleaned away with white spirit or turpentine. If used as a car decal then the matt or glossy stickers shouldn’t damage the paintwork of your car but that will depend on the type of paint and its condition.
11. 12. 13. I put some of the stickers that I made onto my car and some onto a plain plastic drawer unit. They were extremely easy to apply and it only took a matter of seconds to apply them. I have only prepared these stickers for the purposes of this tutorial so didn’t use the fixative varnish but it would be advisable to spray the car decals with the fixative spray before you put them on your car so you can rest assured that ink won’t be effected by the car wash or sunny weather.
The possibilities are endless for the printable vinyl sticker paper, including car decals!
Here are just a few example uses:- wheelie bin numbers, car decals, bumper stickers, name stickers for a child’s scooter or bike, print photos out to display on your fridge, make personalised pictures to put on the front of your diary, print out glossy photos to put in your child’s keepsake book, design labels for kid’s storage containers – e.g ‘Pens’ , ‘Toys’ etc. , name label for a child’s lunchbox.
